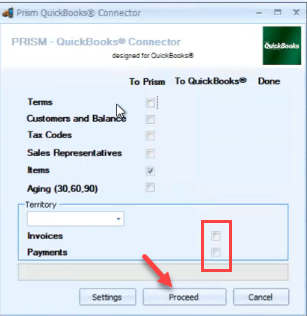
The process of importing to Prism and from Prism to QB
Import To Prism from QuickBooks
To run the connector, go to Transactions drop-down and click on QuickBooks Connector.
Connector will be run once or twice daily to ensure all data is updated and imported to Prism.

Make sure the QuickBooks app is open, run the connector by checking the desired boxes “To Prism” and press Proceed. While importing to Prism, none of the ‘To QuickBooks’ boxes should be checked.

Caution: Do not run the Aging (30,60,90) during working hours. This transfer is taking a lot of resources and should be run after hours.
After the connector finished running, you can review the error log by pressing Details. It will explain and show what has failed and what needs to be changed in QuickBooks to import the data correctly to Prism.

Press ok and click on Details to see the log.
The letter “E” in the beginning of each line will indicate if there is any error. If there is such letter, it will explain exactly what needs to be fixed in QuickBooks to move the data correctly.

Press close to close the window or Print to print the log.
2. Import From Prism from QuickBooks
Run the connector by checking the desired boxes “To QuickBooks” and press Proceed. While importing to QuickBooks, none of the ‘To Prism’ boxes should be checked.
Note: Do this only when ready to send invoices to QuickBooks.

